
Links to everything on this page:
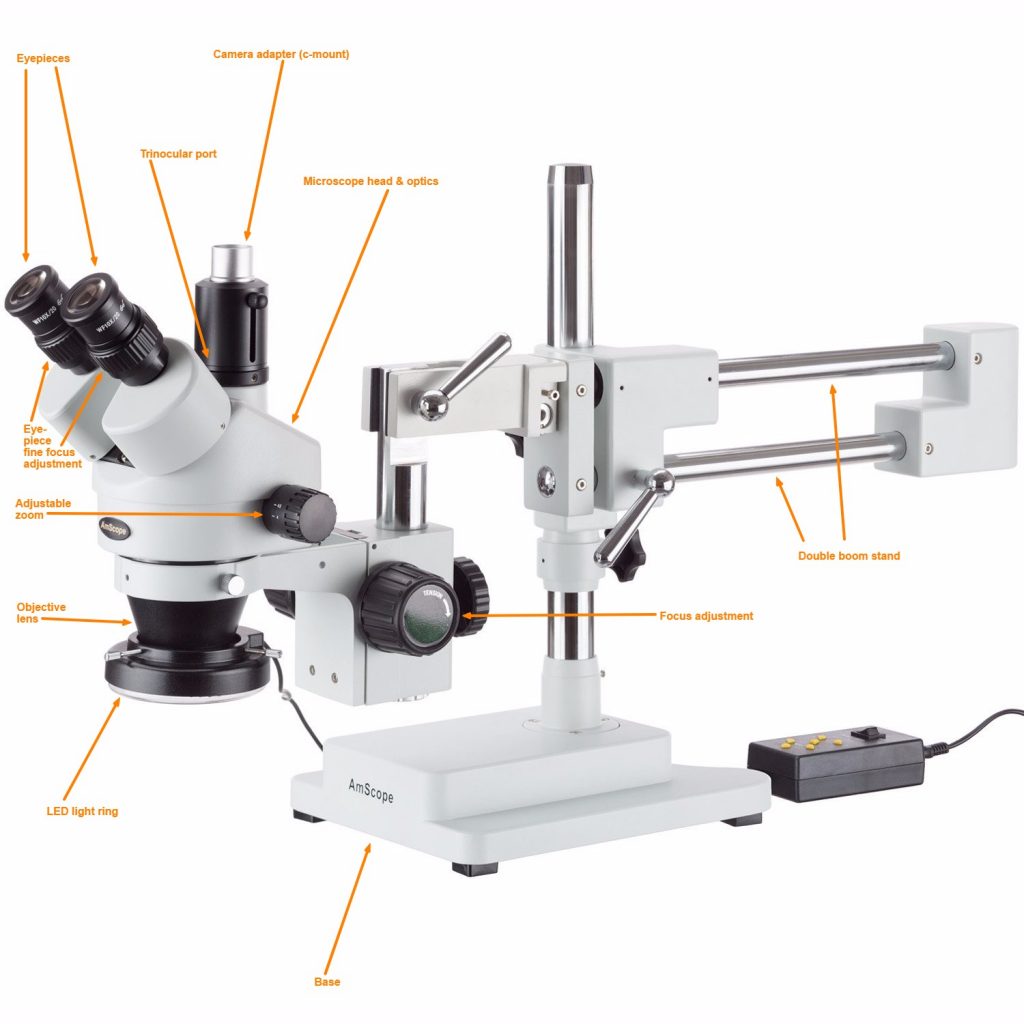
- Amscope SM-4TZ-144A Professional Trinocular Stereo Zoom Microscope ($529; amazon.com)
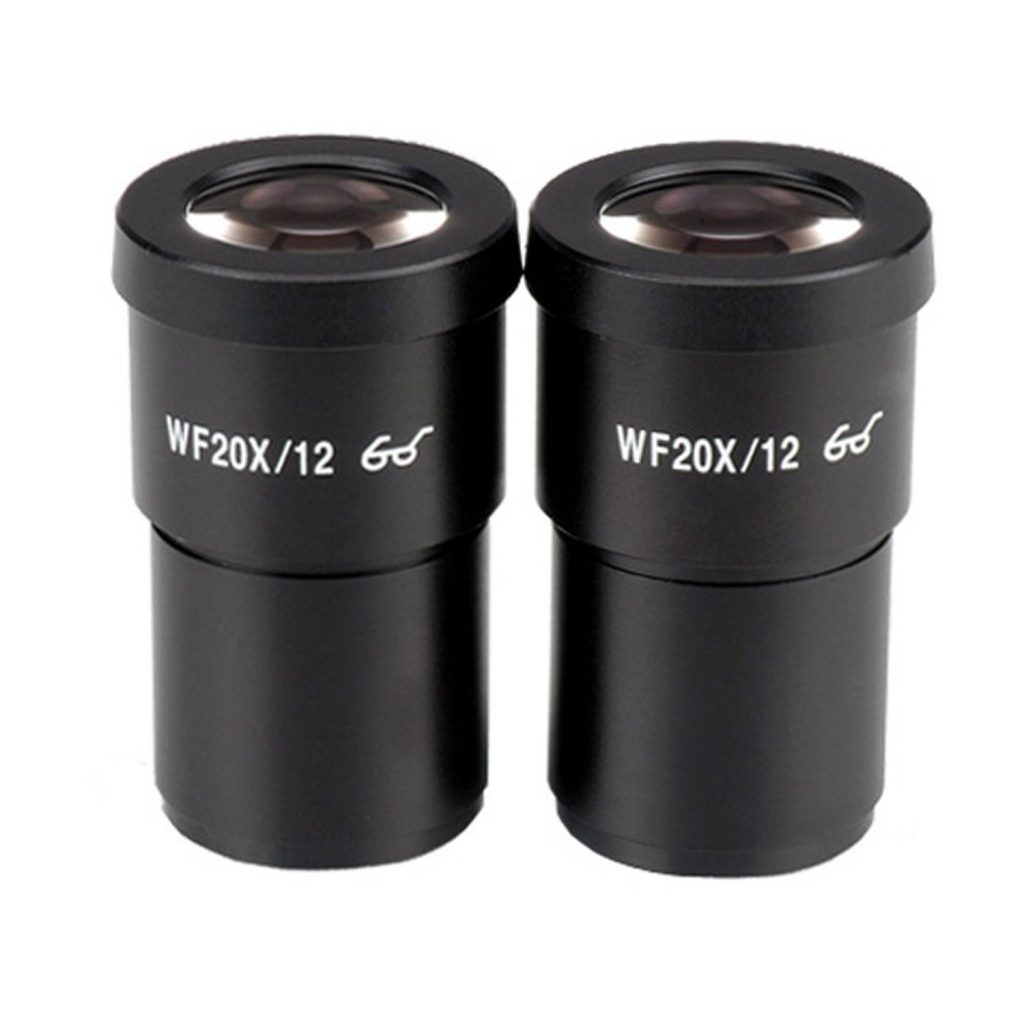
- Amscope EP20X30E Pair of Extreme Widefield 20X Eyepieces (30mm) ($44; amazon.com)
- Amscope SM07 0.7X Barlow Lens For SM Stereo Microscopes (48mm) ($49; amazon.com)
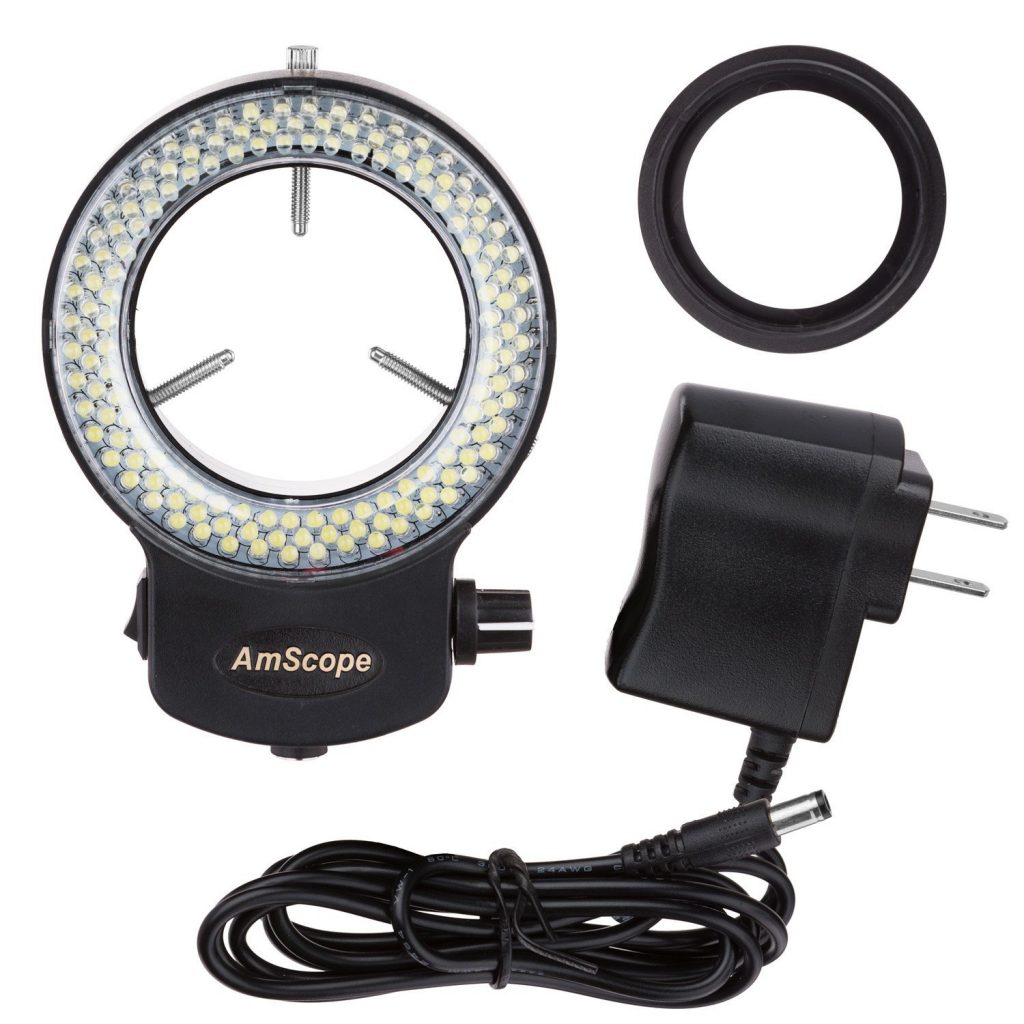
- Amscope LED-144B-ZK Black 144 PCS Adjustable LED Ring Light ($24; amazon.com)
- Amscope SM-4NTP 7X-45X Simul-Focal Stereo Lockable Zoom Microscope ($458; amazon.com)
- C-mount adapter for microscope camera ($35; amazon.com)
- 14MP 720p microscope camera with HDMI output ($139; amazon.com)
- Nikon SMZ-U microscope (Price varies; amazon.com)
To work with microscopic components, you will need a microscope to see. Physical examination is the first place to start with any repair job, as that will quickly tell you the technician what likely is or isn’t the problem with little thinking on your part.
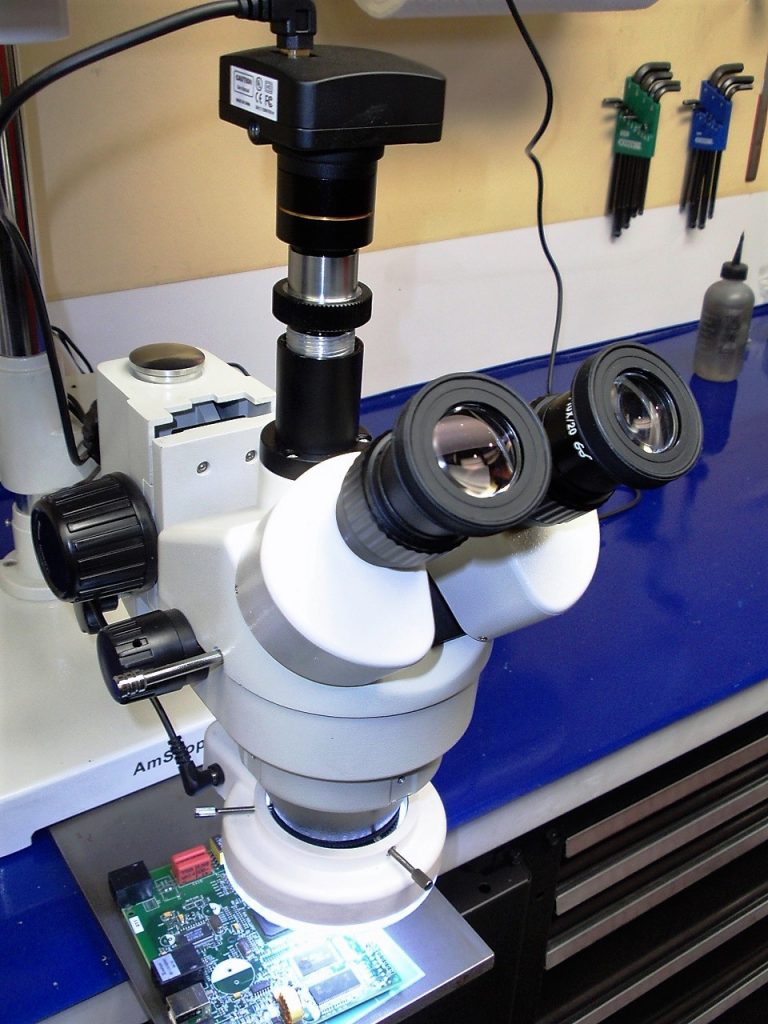
A good microscope generally should cost around $400-800 new. We highly recommend the Amscope SM-4TZ-144A ($529; amazon.com) for a first microscope. This microscope has almost all the key features needed to easily see and work with microscopic components on iPhone and other smartphone motherboards, while also is extremely affordable and will suit the needs of most repair shops for the foreseeable future.
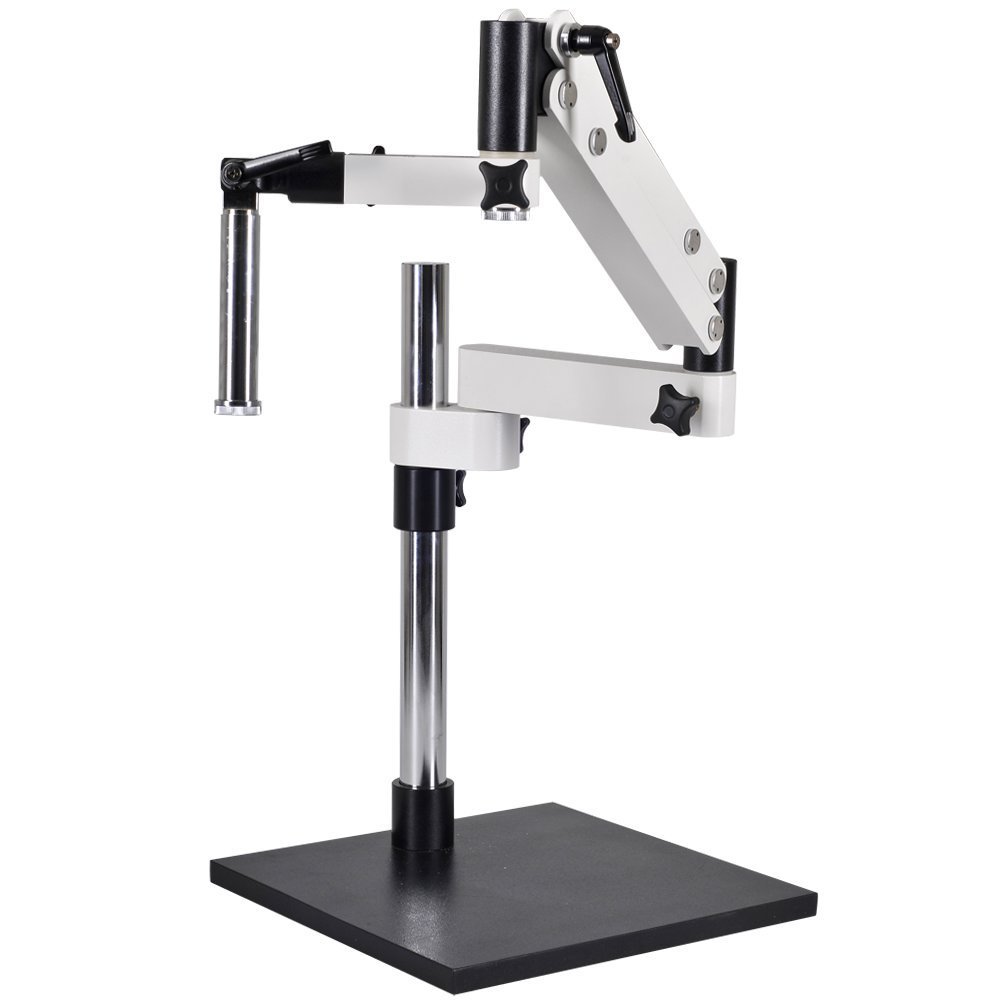
The Amscope comes with a heavy double boom stand, which we prefer over articulating and single boom stands for a few reasons. Firstly, many beginners tend to opt for articulating stands because they believe that it allows them to have infinite flexibility. However, we have found that most articulating stands fail to suit our needs in a few respects – articulating stands are notoriously unstable and suspect to vibrations from surrounding equipment like hot air stations or even other people walking by, making it impossible to see clearly through the microscope. In addition, articulating stands end up being less flexible than boom stands because they are hard to keep in one position when working – they tend to drift up and down and side to side so it is impossible to position the microscope exactly where we want it for that particular motherboard that is being worked on.
Single boom stands are generally cheaper than double boom stands, but also have their disadvantages. Because there is only one cylindrical arm connecting the microscope head to the base, if that arm does not have a locking pall then it is allowed to rotate around its axis, and likewise the head of the microscope will rotate as well. This becomes annoying because a lot of the time we would quickly like to be able to move the head of the microscope in and out of the base to inspect, but with a single boom it must be locked and unlocked each time we move it in or out. Double boom stands allow us to leave the arm unlocked without the head rotating so that we can quickly move it around when needed.

With the Amscope we also find its variable zoom feature valuable. Lower end microscopes have a fixed zoom, which just isn’t practical for working with a variety of different devices. A variable zoom of around 0.5x to 4x or 5x allows us to be able to choose our field of view and magnification for what we are working on, and be able to zoom in to inspect joints and solder balls closely when necessary.
The eyepieces of the microscope are what generally provide the most magnification. A good quality microscope will have modular eyepieces that can be swapped for higher or lower magnification. To calculate the total magnification power of your microscope, multiply the eyepiece magnification by the objective lens magnification:
- (Eyepiece magnification power) x (Objective lens magnification power) = (Total maginifcation power)
With the Amscope, it comes with 10x eyepieces and a 0.45x-4.5x objective lens. This gives us a total magnification power of 4.5x-45x. The eyepieces also should come with rubber eyecups that some people find helpful to rest their eyes on. Also make sure to adjust the eyepiece width so that you can see through both eyepieces at the same time without one going black, then fine tune the focus on each individual eyepiece by closing one eye and turning the focus knob on the eyepiece until the picture is clear.
Working distance must also be taken into consideration when choosing a microscope, as it is extremely important to be comfortable when working under the microscope for prolonged periods of time. Working distance is generally described as the distance between the workpiece and the objective lens of the microscope when the object being examined is in focus. For most microscopes including the Amscope, this is normally around 4” out of the box. However, we find that this is way too little to be comfortable, so we will attach a barlow lens to the head of the microscope in order to increase the working distance to 6”. Some barlow lenses will even increase the working distance to 8” or more, which can be useful for working with motherboards that have a larger height.
What is a barlow lens? A barlow lens is a lens that goes over the objective lens in of the microscope head. Typically they will screw into the head of the microscope and allow you to change the field of view, working distance, and magnification.

Most barlow lenses come in magnifications of 0.3x, 0.5x, 0.75x and 2x. In order to calculate the total magnification power of your microscope with a barlow lens, simply multiply the original magnification power by the factor of the barlow lens (i.e., a microscope that originally had 45x zoom will have 27.5x zoom after adding a 0.5x barlow lens to it):
- (Original magnification power) x (Barlow lens magnification) = (New magnification power)
The magnification of the barlow lens will also affect the working distance of the microscope. Lower magnification barlow lenses will increase the working distance, while higher magnification lenses will decrease the working distance. In order to estimate the working distance, multiply your original working distance by the inverse of the magnification, like so:
- (Original working distance) x (1 / barlow lens magnification) = (New working distance)
Using this formula, we can see that with a 0.5x barlow lens on our Amscope that has a working distance of 4”, we will get a new working distance of 8”. This is a little excessive for our tastes however, and we like to stick to a 0.75x barlow lens ($49; amazon.com) to get a nice middle ground of around 6”. Keep in mind too that as your working distance increases, the amount of light required in order to see the workpiece also increases, so larger working distances will require a brighter and more powerful light.

There are many different types of light sources available for your microscope as well. The most popular ones include LED, halogen/fiber optic, and fluorescent. These also come in the form of ring lights and articulating lights. We have found that using ring lights of either the LED or halogen variety work best. Ring lights attach to the bottom of your microscope head and provide ample even lighting around the workpiece. Articulating lights tend to be uneven and require constant adjustment.
Halogen lights are generally brighter and more powerful than commercially available LED lights, although we have seen some DIY LED lights that are equally as bright. The color of the halogen lights also tends to have more of a yellowish tint to it as opposed to the bright blue of LED lights. This yellowish color provides better contrast when working under the microscope and makes it easier to see especially during long periods under the microscope. However, halogen lights use a lot of electricity and therefore generate a lot of heat – think about having to sit next to a 150w space heater all year long. They also require thick fiber optic cables to connect the ring light to the base station that houses the actual light bulb, limiting the microscope’s range of movement.

The biggest disadvantage of halogen lights though is that the bulbs do not last nearly as long as LEDs do and also were hard to find. We found that we were blowing a bulb every 3-4 months, and they are not something available at Home Depot. At $30/each and requiring us to keep a few in stock in case one blew, we found that although halogen lights made it easier and clearer when examining motherboards, the reliability, flexibility, and low operating cost of LED lights prevailed in the end.
If you would like to add a camera to your microscope, look for a microscope head that is simul-focal such as this Amscope SM-4NTP ($458; amazon.com). A camera is a great way to teach other technicians and assist one another in component level logic board repair, as well as showing customers exactly what sort of repairs need to be made to their device. The trinocular port on the microscope allows the camera to take up its own dedicated spot without losing an eyepiece, while the simul-focal prism allows the user to see through both eyepieces at once while the camera is attached. Be careful of microscopes without simul-focal as it will disable one of the eyepieces when using the trinocular part, completely defeating the purpose of the trinocular port.
Many different cameras are available, however we recommend using ones with HDMI out instead of USB out. USB out tends to be very laggy and requires special drivers and software support, while HDMI is an industry standard and can work with TVs, monitors, capture cards, and lots more.
720p will be adequate, while 1080p will of course be better. There are also lots of options that include either 30 FPS or 60 FPS. We have found that this 720p 30 FPS camera ($139; amazon.com) provides a great picture at a great cost to value ratio. It also allows for direct HDMI output, so you can connect it straight to a TV or monitor. Keep in mind though that most cameras will require a specific c-mount adapter to mount it to the microscope’s trinocular port. This c-mount adapter ($35; amazon.com) is the one we found works with the Amscope SM-4NTP microscope.

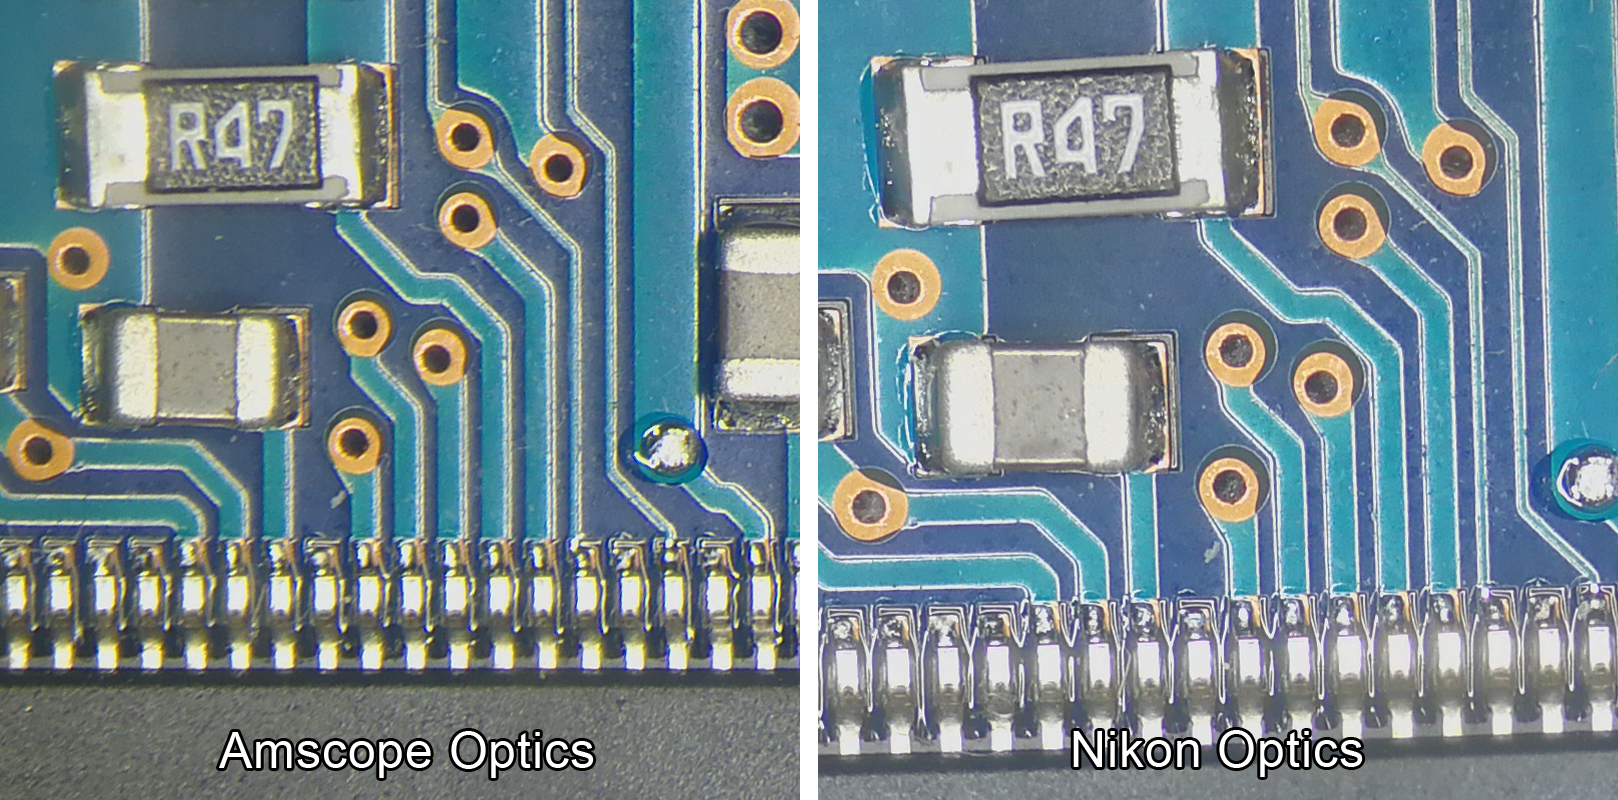
The most important part of the microscope though is the actual glass within the microscope. The quality of the optics varies greatly between each model and brand. For the price, Amscope have got a completely acceptable and functional set of optics, however, for the sharpest and clearest view we have found that Nikon lenses are unbeatable. The clarity and sharpness provide an unrivaled depth of view that is almost 3D, and we found that it allowed for more objects with different heights to appear in focus at once. If you have the time, we recommend scouring eBay and surplus sites for used lab equipment which will usually have significantly better optics.
Hopefully you now understand everything you will ever need to know about microscopes for micro soldering. If you have any questions or feedback we would leave to hear from you below in the comments!
Micro Soldering Supply
The #1 stateside iPhone and iPad logic board parts supplier!
https://microsolderingsupply.com
Excelent write up!
HAVE YOU BEEN RIPPED OF YOUR COINS.
Have you gotten your bitcoins stolen from your wallet or invested in an ICO that turned out to be a scam, you are not alone because this happened to me too. I initially lost $96,000 in just less then five months from Fake investment scam company. My friend referred me to a hacker who helped me recover all my funds within 3 days. I’m speaking up to improve awareness of these cryptocurrency thieves and help as much as i can to reduce victims to the minimum. If you have been a victim, Simply contact Them ( MorrisGray380 at Gmail Dot Com )or whatsapp ( +1 607 698 0239 )……)
I’m recommending the safest and most dependable cryptocurrency recovery solution to assist you. Matthew Bevan is a professional Hacker and cryptocurrency recovery expert for almost a Decade now . When I misplaced my
wallet last year, it was incredibly helpful to me. Since I was still learning about cryptocurrencies, I invested almost all of my money.
In March 2023, I traded and invested on the platform and lost $200,000 USD. The trading system stopped letting me take money out of my wallet in September 2023, but I was still required to pay a number of costs, including tax, membership, card, and withdrawal fees, as well as account reactivation fees. After some time, I discovered numerous testimonials on various cryptocurrency websites detailing how RECOVERYBUREAUC @gmailcom
assisted numerous individuals in getting their stolen, conned,or lost money using bitcoin or any other cryptocurrency. When I reached out to him, he assisted me. his contact information is:
EMAIL: RECOVERYBUREAUC @gmail.com
WhatsApp: +1 763 898 2440
RecoveryBureauC@gmail.com
Recording the success in Cryptocurrency, Bitcoin is not just buying and holding till when bitcoin sky-rocks, this has been longed abolished by intelligent traders ,mostly now that bitcoin bull is still controlling the market after successfully defended the $20,000 support level once again and this is likely to trigger a possible move towards $40,000 resistance area However , it’s is best advice you find a working strategy by hub/daily signals that works well in other to accumulate and grow a very strong portfolio ahead. I have been trading with Mr Bernie doran daily signals and strategy, on his platform, and his guidance makes trading less stressful and more profit despite the recent fluctuations. I was able to easily increase my portfolio in just 3weeks of trading with his daily signals, growing my 0.9 BTC to 3.9BTC. Mr Bernie’s daily signals are very accurate and yields a great positive return on investment. I really enjoy trading with him and I’m still trading with him, He is available to give assistance to anyone who love crypto trading and beginners in bitcoin investment , I would suggest you contact him on WhatsApp : + 1424(285)-0682 , Gmail : BERNIEDORANSIGNALS@GMAIL.COM for inquiries , Bitcoin is taking over the world
No it isn’t, its just taking over idiot’s retirement accounts.
I’m recommending the safest and most dependable cryptocurrency recovery solution to assist you. Matthew Bevan is a professional Hacker and cryptocurrency recovery expert for almost a Decade now . When I misplaced my
wallet last year, it was incredibly helpful to me. Since I was still learning about cryptocurrencies, I invested almost all of my money.
In March 2023, I traded and invested on the platform and lost $200,000 USD. The trading system stopped letting me take money out of my wallet in September 2023, but I was still required to pay a number of costs, including tax, membership, card, and withdrawal fees, as well as account reactivation fees. After some time, I discovered numerous testimonials on various cryptocurrency websites detailing how RECOVERYBUREAUC @gmailcom
assisted numerous individuals in getting their stolen, conned,or lost money using bitcoin or any other cryptocurrency. When I reached out to him, he assisted me. his contact information is:
EMAIL: RECOVERYBUREAUC @gmail.com
WhatsApp: +1 763 898 2440
RecoveryBureauC@gmail.com
Hello Guy’s
Fullz available fresh USA UK CANADA
Updatd-2025 Database with guarantee
Fresh Stuff never sold before
Bulk quantity available
SSN NIN SIN Fullz with all info
DL Scans Fresh Front & Back with Selfie
Contact us here for more info & deals:
Tele Gram – @ killhacks , @ leadsupplier
What’s App – + (1)..727.. 788..6129
TG Channel – t.me/ leadsproviderworldwide
*Be aware from scammers using our cloned names
(Make sure to visit our channel for real usernames & latest updated stuff)
Fullz|Pros|Leads List:
SSN DOB DL Address Fullz USA
NIN DOB DL Address Sort code & Account number Fullz UK
SIN DOB Address MMN Email Phone Fullz Canada
DL Scans front back with SSN USA
DL Scans real Front back with Selfie USA|UK|CA
Passport Photos with Selfie USA|UK|CA
Business EIN Company Pros USA
High Credit Scores Fullz USA|UK|CA
Dead Fullz in bulk quantity
CC Fullz with CVV & billing Address
Dumps with Pin Track 101 & 202 with Cash out Tutorials
Children Fullz 2011-2023
Old & young Age Fullz 1
Good write up. I would disagree with the articulating arm being impossible to use. As they do vibrate, we use them at all 4 stores, and vibrations transmitted though them are minimal, even with the hot air station stored on the base.
Highly Recommended!
Very insightful, i will also say this here. Investment is one of the best ways to achieve financial freedom. For a beginner there are so many challenges you face. It’s hard to know how to get started. Trading on the Cryptocurrency market has really been a life changer for me. I almost gave up on crypto at some point not until saw a recommendation on Elon musk successfully success story and I got a proficient trader/broker Mr Bernie Doran , he gave me all the information required to succeed in trading. I made more profit than I could ever imagine. I’m not here to converse much but to share my testimony; I have made total returns of $10,500.00 from an investment of just $1000.00 within 1 week. Thanks to Mr Bernie I’m really grateful,I have been able to make a great returns trading with his signals and strategies .I urge anyone interested in INVESTMENT to take bold step in investing in the Cryptocurrency Market, you can reach him on WhatsApp : +1(424) 285-0682 or his Gmail : BERNIEDORANSIGNALS@GMAIL.COM bitcoin is taking over the world, tell him I referred you
Thanks so much for this guide. With this information, I was able to pick out the right microscope & camera setup for me!
Helpful guide, but I disagree about the double boom stand. For anyone who does this day-in-day-out, I’d agree, but those folks wouldn’t need this guide anyway.
For a general-purpose microscope, the normal microscope stand from AmScope is the right thing. The key advantages are that the microscope is portable (you can reasonably carry it), and you have lighting available from underneath. As a general-purpose microscope, that’s much more helpful. It works reasonably for most soldering work too. With the Amscope, you can also rotate the head if you don’t want the scope over the stand.
In practice, the scope is far enough away from the support that it’s fine for all microsoldering and inspection work I’ve done. Sometimes, for a superlarge board, I might need to rotate it to see one corner, but that’s not a big deal; it’s maybe once or twice a year.
I’m with Peter re: the double-boom. YouTube user @electronupdate went over his setup here[0], covering everything from solder rework of SMT 0402s to taking pictures of actual silicon dies. For general purpose hobbyists, I think he goes over the whole gamut fairly well.
Hackaday[1] tried to approach this topic, and while the article itself wasn’t extraordinarily good, the discussion was pretty great for covering the pros/cons of each subset of work and what tools work best for that subset (reworking through-hole cold solder joints is going to require an entirely different setup than someone who is inspecting IC masks). RE board rework: If you’re going to be looking through a microscope all day doing, you probably already have a Mantis. But if you don’t- get one and your eye fatigue will disappear.
Almost more important than your optics is 1) a decent x-y microscope stage/tooling to help properly 2) orient and place micro-probes or irons on the right pads and 3) vibration damping on your table if you’ve got noticeable seismic activity around you (Californians, that’s you). Even with the most expensive optical setup and your fancy Metcal or JBC rework station, if you’re trying to put down 0201 termination resistors for your BGA package with 488 lands, you’re going to likely have a pretty hard time. (Newport Optics out of California is generally the ‘go to’ brand for x-y stages and their used gear is fairly cheap. )
[0] https://www.youtube.com/watch?v=DyCLzD5EtHs
[1] https://hackaday.com/2017/11/14/if-you-want-to-spend-on-a-microscope/#comments
very help article, just got my equipment for soldering, hope can learning more from you in the future
Thank you so much for this blog. Your blog is really helpful to choose the right microscope and camera set up.
The amazon linked cmount trinocular port adaptor is threaded on both ends. One end for camera, and the other end to attach to the microscope.
The photo port in the microscope does not have female threads on it to receive the Amazon linked cmount adaptor. It is a smooth ring in the base of the trinocular port with an Allen screw in the side to tighten.
I found this out the hard way! 🙂
Never a good idea to tell beginners to waste money. I respectfully disagree. When I first started out I purchased both styles and the rouble boom was a million times better. Anyone who buys an articulating arm will eventually buy the double boom because its light years better and most efficient.
HAVE YOU BEEN SCAMMED OF YOUR COINS
I invested a total of$95,000.00USD worth of Bitcoin with an online company who does trading and was guaranteed a payout of 25% a week. They ended up shutting down their company website but their website was still running. So I could still see my dashboard at that time and instead of paying weekly they ended up compounding my money. It ended up compounding to$179, 000USD so I requested for a withdrawal which was declined before they shutdown their website, I complained to my colleague at work who directed me about this recovery expert, Mr. Morris Ray, that helped him, I contacted him immediately, what surprised me most, was that I recovered my money that same week. You can contact him on his email at MorrisGray830 at Gmail dot com and on WhatsApp: + 1 (607) 698-0239 and he will assist you on the steps to recover your invested funds.
Just trying to help those who where scammed just the way I was too.
I wanna say thanks to DARK WEB for helping me boost my credit score from 420 to 840 excellent. Last year June i wasn’t able to afford to pay my house rent due to my low credit score until i met dark web he help me erased all bad reports on my credit line, boost my credit score. I would advise y’all to get in touch with him if you have any issues with your credit score, just text him on his email; DARKWEBONLINEHACKERS@GMAIL.COM or his number (803) 392-1735
HELLO EVERYONE, This is for everyone seeking recovery of stolen crypto coins, recovery of any lost funds to online scams , recovery of cryptocurrency lost to reapers in forex trades and binary options This is for persons seeking to recover all of their lost funds to online scams, contact address–> Morris Gray 830 @ gmail . com for successful recovery and thank me later. I had my blockchain wallet spoofed by merciless scams, due to the ignorance of 2FA authorization, they were able to get away with 5.0147BTC from my wallet , this made me go through Truma and depression as i was desperately in need of help , i made my research online and came across a very credible and reliable recovery agent on the internet with this information Morris Gray 830 @ gmail . com, The hack agent helped me recover all I lost and also revealed the identity of the perpetrators , that’s why I’m most appreciative and also sharing their contacts info for anyone in a similar situation seeking to recover funds lost to online scams , contact the recovery specialist at: Morris Gray 830 @ gmail . com or Business Whats app: +1 607 698 0239. Bless you sir Morris Gray.
HELLO EVERYONE, This is for everyone seeking recovery of stolen crypto coins, recovery of any lost funds to online scams , recovery of cryptocurrency lost to reapers in forex trades and binary options This is for persons seeking to recover all of their lost funds to online scams, contact address–> Morris Gray 830 @ gmail . com for successful recovery and thank me later. I had my blockchain wallet spoofed by merciless scams, due to the ignorance of 2FA authorization, they were able to get away with 5.0147BTC from my wallet , this made me go through Truma and depression as i was desperately in need of help , i made my research online and came across a very credible and reliable recovery agent on the internet with this information Morris Gray 830 @ gmail . com, The hack agent helped me recover all I lost and also revealed the identity of the perpetrators , that’s why I’m most appreciative and also sharing their contacts info for anyone in a similar situation seeking to recover funds lost to online scams , contact the recovery specialist at: Morris Gray 830 @ gmail . com or Business Whats app: +1 607 698 0239. Bless you sir Morris Gray..
It is wonderful to have someone so skilled and understanding of how cyberspace works. I would recommend your service to anyone who finds themselves in a situation of identity theft or cyber crime. I was a victim of a cryptocurrency investment scam running to the cost of $64,000.00. I felt betrayed because I really trusted these crypto guys after seeing my little investment grow into hundreds of thousands. ( CYBERGENIE@CYBERSERVICES.COM ) Came to my rescue and helped me recover my investment capital within 36 hours because I did all I could to get my funds back…
When I first invested with these crypto-currency traders on the Internet, All I could think about at that time was getting my profits and giving my daughters a happy life till they kept asking for more money and the fees were endless while trying to withdraw my investment. That’s when I realized that I have been conned. I was recommended to an ethical hacker with expertise in the “Recovery of Bitcoin” . I hired them; their fees were appealing, and their results were more than and their fees were appealing and their results were more than what I expected. I successfully recovered my lost BTC and ETH from these scammers with the help of ( Cybergenie AT cyberservices DOT com ) WA +1-252-512-0391. I highly recommend this Ethical hacker to anyone with ANY Cyber related fraud issue, Phone Hack, or seeking a Private Investigator…
“I am writing this review to express my sincere gratitude to this NFT and USDT recovery hacker for all that he did for me during one of the most stressful and painful times in my life. His professionalism and guidance, at a time when I questioned myself how dumb I was to give out $1.2 Million Usdt to an NFT trading scammer, helped me to accept that so long there is a problem, there will always be a solution. He provided me with irrefutable proof that strengthened my doubts about the possibility of recovering or tracking lost BTC or USDT. I have no doubt about the decisions I made afterward. It took a while but success was achieved in recovering all the USDT Tokens I had sent. At a time when I felt like my whole world was tumbling down around me, his concern was truly appreciated. I highly recommend his services and while I hope never to need him again, I will be sure to call him if need be. Thanks so much, Cyber Genie Team”
” ( Cybergenie (@) cyberservices (.) com ) ”
” ( WA +1252)(5120391)”
GET RICH WITH BLANK ATM CARD, Whatsapp: +18033921735
I want to testify about Dark Web blank atm cards which can withdraw money from any atm machines around the world. I was very poor before and have no job. I saw so many testimony about how Dark Web Online Hackers send them the atm blank card and use it to collect money in any atm machine and become rich {DARKWEBONLINEHACKERS@GMAIL.COM} I email them also and they sent me the blank atm card. I have use it to get 500,000 dollars. withdraw the maximum of 5,000 USD daily. Dark Web is giving out the card just to help the poor. Hack and take money directly from any atm machine vault with the use of atm programmed card which runs in automatic mode.
You can also contact them for the service below
* Western Union/MoneyGram Transfer
* Bank Transfer
* PayPal / Skrill Transfer
* Crypto Mining
* CashApp Transfer
* Bitcoin Loans
* Recover Stolen/Missing Crypto/Funds/Assets
Email: darkwebonlinehackers@gmail.com
Text & Call or WhatsApp: +18033921735
GET RICH WITH BLANK ATM CARD,, Whatsapp: +18033921735
I want to testify about Dark Web blank atm cards which can withdraw money from any atm machines around the world. I was very poor before and have no job. I saw so many testimony about how Dark Web Online Hackers send them the atm blank card and use it to collect money in any atm machine and become rich {DARKWEBONLINEHACKERS@GMAIL.COM} I email them also and they sent me the blank atm card. I have use it to get 500,000 dollars. withdraw the maximum of 5,000 USD daily. Dark Web is giving out the card just to help the poor. Hack and take money directly from any atm machine vault with the use of atm programmed card which runs in automatic mode.
You can also contact them for the service below
* Western Union/MoneyGram Transfer
* Bank Transfer
* PayPal / Skrill Transfer
* Crypto Mining
* CashApp Transfer
* Bitcoin Loans
* Recover Stolen/Missing Crypto/Funds/Assets
Email: darkwebonlinehackers@gmail.com
Text & Call or WhatsApp: +18033921735
LEGITIMATE CRYPTO RECOVERY EXPERT….!!!
Good day Audience, I want to use this great medium to announce this information to the public about Mr MORRIS GRAY. few months back, I was seeking an online BTC investment plan when I got scammed for about $172,000. I was so down and didn’t know what to do until I came across a timeline about Mr MORRIS GRAY. so I reached out to him and to my greatest surprise, they were able to recover all the funds which I had previously lost to the Devils. I am so glad to share this wonderful news with you all because it cost me nothing to announce a good and reliable Hacker as Mr MORRIS GRAY, His direct email is Morris Gray 830 at gmail dot com, WhatsApp: +1 (607) 698-0239…..!!
HAVE YOU BEEN RIPPED OF YOUR COINS.
Have you gotten your bitcoins stolen from your wallet or invested in an ICO that turned out to be a scam, you are not alone because this happened to me too. I initially lost $96,000 in just less then five months from Fake investment scam company. My friend referred me to a hacker who helped me recover all my funds within 3 days. I’m speaking up to improve awareness of these cryptocurrency thieves and help as much as i can to reduce victims to the minimum. If you have been a victim, Simply contact Them ( MorrisGray380 at Gmail Dot Com )or whatsapp ( +1 607 698 0239 )……
Hello world! Permit me to discuss how, Cyber Genie Hack Pro team assisted me in getting my forgotten crypto wallet access back. Losing access to my wallet was traumatizing and heartbreaking to my household because it was a joint wallet where I and my partner decided to save for the future instead of using all these ridiculous financial banks in the USA controlled by the Matrix. Our precious crypto savings were on the verge of vanishing before our very before. If there is one thing I am forever grateful for in 2024 is my encounter with Cyber Genie’s team. These guys didn’t even let me explain my task fully, how they delved into getting solutions for me to access my crypto wallet back still wows me and my partner. There’s no better way to start the new year than with the best tech team ensuring my family’s data are safe on the internet. If you have any important query related to crypto funds recovery, don’t hesitate to find them on:
WEB: (https ://) cy bergeniehackpro (.) xyz/
W/A: +’1’2’5’2’5’1’2’0’3’9’1′
TELLEGRAM: “cyb ergeniehackpro”
Anyone else finding it extremely funny to see those really truly sad spammers reply on a great article about microscopes like this one?
It just feels like those spammers need to compensate for something and apparently they need a microscope to identify what they’re missing.
Too bad we now are flooded with such extremely pathetic spam comments below such a great explanation topic like this one.
For the author of this great tutorial: Well done!
The pain after losing a hard earned large sum of money to a fake online investment scheme tends to be so hard to bear. I happened to lose $379,000 pounds to a fake Crypto fraudulent company that lured me into investing with them to make huge sums of profits. Profits accumulated well till it was time to withdraw the funds, The company kept on asking for funds to withdraw my funds. On noticing I had been scammed they had already duped me all my funds. I was really in disbelief and had to look for a means to have my funds back. Asset Hacker Recovering company were the Recovery Experts I came across. I provided the required information to the experts and all my funds were recovered back by the Hackers. Asset Hacker Recovering company are the only recommendable hackers to any Scam victim out there that has been scammed or have bitcoin lost and wants to recover there funds back CONTACT INFO : Whatsapp +393510777769/ Email: Assetcryptohacker@proton.me / Telegram@Assetcryptohacker
Fantastic article on micro soldering microscopes! The detailed explanation of features and benefits really helps in choosing the right equipment for precision work.
If you’re considering investing your money or depositing funds with a company, please take a moment to read my ordeal before making any decisions. I learned this the hard way, and I want to share my story to help others avoid the same pitfalls.
I initially deposited a significant amount of money—well over $700,000—into an investment account with a company that seemed reputable at first. The prospect of earning substantial profits was enticing, and their promotional materials suggested that my investment would grow steadily. Everything seemed promising until the time came to withdraw my profitsTo my dismay, when I attempted to access my account to make a withdrawal, I was unable to log in. My first reaction was one of confusion and concern, but I assumed it might be a temporary glitch. However, days turned into weeks, and the situation didn’t improve. My account remained inaccessible, and my attempts to reach out for help were met with silence. I tried contacting their customer service through every channel available—phone, email, even social media—but received no response.As the days passed, I became increasingly anxious. The realization that my substantial investment might be gone was overwhelming. I was not prepared to let go of such a significant sum, and I knew I needed to take action to recover my funds.Desperate for a solution, I began researching ways to address the situation. I discovered that there were organizations and services specializing in recovering funds from situations like mine. After thorough research, I decided to file a complaint with Cyber Tech Wizard
, a firm that seemed to have a good track record of helping people in similar predicaments.Filing the complaint with Cyber Tech Wizard
was a crucial step. Their team was responsive and took my case seriously. They investigated the issue and used their expertise to track down my funds. Their professionalism and dedication were evident throughout the process. After some time and considerable effort, they managed to retrieve not only my initial deposit but also the profits that had accrued in the account.Reflecting on the experience, I am incredibly grateful for the assistance I received from Cyber Tech Wizard. Without their help, I would have likely lost my entire investment. I urge anyone who finds themselves in a similar situation to act swiftly and seek professional assistance if necessary. Don’t hesitate to file a complaint if you encounter problems with financial institutions or investment companies through Cyber Tech Wizard with their Email cybertechwizard@cyberservices.com. It was challenging and stressful, it reinforced the importance of vigilance and due diligence when dealing with financial matters. Ensure you work with reputable firms and always have a plan in place for addressing issues if they arise. I’m thankful for the resolution and the support I received from Cyber Tech Wizard
and I hope my story helps others avoid the difficulties I faced.
I’m recommending the safest and most dependable cryptocurrency recovery solution to assist you. Matthew Bevan is a professional Hacker and cryptocurrency recovery expert for almost a Decade now . When I misplaced my
wallet last year, it was incredibly helpful to me. Since I was still learning about cryptocurrencies, I invested almost all of my money.
In March 2023, I traded and invested on the platform and lost $200,000 USD. The trading system stopped letting me take money out of my wallet in September 2023, but I was still required to pay a number of costs, including tax, membership, card, and withdrawal fees, as well as account reactivation fees. After some time, I discovered numerous testimonials on various cryptocurrency websites detailing how RECOVERYBUREAUC @gmailcom
assisted numerous individuals in getting their stolen, conned,or lost money using bitcoin or any other cryptocurrency. When I reached out to him, he assisted me. his contact information is:
EMAIL: RECOVERYBUREAUC @gmail.com
WhatsApp: +1 763 898 2440
RecoveryBureauC@gmail.com
If you need help recovering funds from companies that stole them from you in form of investment but you got nothing in return, the best help i recommend is SilentQuantaHackers, they are reliable trust me I am speaking from experience, feel free to reach out to them via…
Telegram: t.me/silentquantahackers
Email: silentquantahackers@gmail.com
Hello, it’s a lovely morning here. I am Vanessa Craig, and I am writing this article to inform everyone that just because we overlook certain information due to our lack of knowledge doesn’t mean it isn’t real. I am currently valued at more than £70 Million Pounds because I acknowledged this vital information. I had assistance from a man named Meduza I found online whose impressive testimonials about his spell work are legit and genuine. His lottery spell enabled me to win £65 Million Pounds in the lottery by providing me with the accurate winning numbers after he performed a lottery spell for me. I placed my full trust in him and followed his instructions without any hesitation and right now, I am proud to say that Meduza’s spiritual advice for winning the lottery is superb and outstanding. I am very grateful to him for his help. To know more, reach out to him at
WhatsApp: +1 807 907 2687
Email: lordmeduzatemple@hotmail.com
Facebook: lordmeduzatemple
A YouTube video about an “arbitrage bot” intrigued me. It promised consistent profits by exploiting price differences between crypto exchanges. The demonstration seemed authentic, and the comments were full of positive feedback. I followed the instructions, deployed the smart contract via a Remix-like platform, and transferred initially $5,000 worth of cryptocurrencies, and later several thousand dollars in Bitcoin and USDT transactions.
A week later, the bot’s interface stopped working, and my funds were frozen. I could neither access them nor withdraw anything. When I realized it was a scam, I felt helpless. The contract was cleverly worded to redirect all funds to a hidden wallet controlled by the scammer.
That’s how I came across ICC Recovery. I contacted them without great expectations, but their team took my case seriously from the start. Using advanced blockchain forensics and smart contract analysis, they tracked the movement of my stolen funds across multiple addresses and exchanges. They compiled a detailed report that not only helped law enforcement identify the fraud ring but, through coordinated action with the exchanges’ compliance teams, also enabled the recovery of over 80% of my funds.
If you’ve been a victim of fraud, services like ICC Reclaim can help you get some of your money back. Act quickly and seek help if you’ve been defrauded. You can reach ICC at: (IRON-CLAD-CYBER-@-TECHIE-.com) (IRON-CLAD-CYBER-RECOVERY-@-GMAIL-.com). ICC Recovery was more than just a service; they were my lifeline. Their professionalism, speed, and expertise turned a nightmare into a second chance. If you’ve been defrauded in the crypto space, don’t stay silent and come forward. There is a real path to justice and reparation.
CONTACT ETHICALHACKERS009 @ GMAIL COM or whatsapp +14106350697 for all your hacking or pi jobs, they are very reliable and competent, they helped me hack into my spouse phone remotely and sent my saved up crypto with her back to my wallet after she spent some on her new man,hacked into all her socials remotely got me texts and videos to confirm she was cheating some of which i used in the court of law that got me custody of our children, hacked into my credit line, increased my credit score, erased all bad credit report you ever need the help of a hacker or professional pi for any hacking job contact them and thank me later
Hello Guy’s
Fullz available fresh USA UK CANADA
Updatd-2025 Database with guarantee
Fresh Stuff never sold before
Bulk quantity available
SSN NIN SIN Fullz with all info
DL Scans Fresh Front & Back with Selfie
Contact us here for more info & deals:
Tele Gram – @ killhacks , @ leadsupplier
What’s App – + (1)..727.. 788..6129
TG Channel – t.me/ leadsproviderworldwide
*Be aware from scammers using our cloned names
(Make sure to visit our channel for real usernames & latest updated stuff)
Fullz|Pros|Leads List:
SSN DOB DL Address Fullz USA
NIN DOB DL Address Sort code & Account number Fullz UK
SIN DOB Address MMN Email Phone Fullz Canada
DL Scans front back with SSN USA
DL Scans real Front back with Selfie USA|UK|CA
Passport Photos with Selfie USA|UK|CA
Business EIN Company Pros USA
High Credit Scores Fullz USA|UK|CA
Dead Fullz in bulk quantity
CC Fullz with CVV & billing Address
Dumps with Pin Track 101 & 202 with Cash out Tutorials
Children Fullz 2011-2023
Old & young Age Fullz 1
Losing money to a crypto scam was one of the hardest lessons I’ve ever learned. I had invested my savings into a cryptocurrency trading platform that seemed trustworthy at first, great reviews, friendly support, and consistent profits showing on the dashboard. But everything changed the day I tried to withdraw my funds. My account got frozen, and within hours, the website vanished. Just like that, all my money was gone.The emotional pain was unbearable. I felt angry, ashamed, and completely hopeless. I couldn’t believe I had been deceived so easily. For weeks, I searched online for ways to recover my stolen cryptocurrency, but every forum post and “solution” seemed uncertain or full of false promises. Then, a close friend introduced me to Mbcoin Recovery Group, a professional cryptocurrency recovery company known for helping victims of crypto scams and fraudulent investments. I was skeptical at first, but after reading reviews and seeing their verified recovery cases, I decided to reach out.From the moment I contacted them, I knew I was dealing with experts. The team at Mbcoin Recovery Group explained every step clearly, from tracing blockchain transactions to working with crypto exchanges to identify the scammers’ wallets. Their communication was constant, transparent, and reassuring. After several weeks of investigation and tracking, Mbcoin Recovery Group successfully recovered a significant portion of my lost funds. I was shocked and deeply grateful. It felt like a miracle after months of despair.What makes Mbcoin Recovery Group truly stand out is their professionalism, honesty, and genuine care for victims of crypto fraud. They don’t promise miracles overnight, but they deliver real results with proven blockchain expertise.If you’ve lost money to crypto scams, don’t give up hope. Mbcoin Recovery Group can help you trace, recover, and secure your assets, just like they did for me. They turned my story of loss into one of recovery and renewed faith. Contact:
Email: Mbcoinrecoverygroup @ aol. com
Text/Phone: +1 346 954-1564
(https: // mbcoinrecoverygrou.wixsite. com/mb-coin-recovery)
My crypto wallet was successfully recovered by Morphohack, a team of ethical hackers and cybersecurity professionals. They helped me recover all the crypto coins I lost when my wallet became inaccessible. The team was extremely helpful and made the entire recovery process seem easy and stress-free. I highly recommend their services to anyone in need of reliable crypto recovery assistance. ( Morphohack@cyberservices. com )
I lost my pension savings to a romance scam. I felt so ashamed I didn’t even want to tell my kids. A friend in a cybersecurity group told me about this hacker named Steve Wozniak Wizard. I reached out, and he actually listened. No judgment. A week later, I got a message: ‘Check your wallet address.’ I nearly cried when I saw the funds back. Whoever this guy is, he’s the real deal. So you can also contact him if you’ve fell victim or know someone who has been a victim of this online frauds happening daily, am sure he’d be glad to help.You can contact him through — Email (stevewozniakwizard(@)gmail. com)
Telegram: https://t.me/stevewozniakwizardrecovery
I fell for a scholarship scam and lost my entire semester’s tuition. The bank said the transaction couldn’t be reversed because it was crypto. I thought I was done. My older brother told me about Wozniak Wizard, this legendary hacker who helps people. I didn’t expect much, but he actually recovered the funds from a burner wallet. I’m back in school because of him. You can contact him also
Contact details : Email (stevewozniakwizard(@)gmail. com)
Telegram: https://t.me/stevewozniakwizardrecovery
Do you need assistance recovering cryptocurrency that has been lost to scammers, recovering lost cryptocurrency wallets, or reporting a Bitcoin scammer to recover cryptocurrency? The only viable solution is to work with an expert like SPYHOST. After losing $170,000 to a fraudulent online investment firm, I had made numerous attempts to get my money back. The majority of the recovery firms I looked at ultimately defrauded me of additional money. My former work colleague told me about Spyhost Cyber services , so I contacted them. They ware able to retrieve my money when I sent them the necessary documents. Contact them via email at (Spyhost @cyberdude.com)